A customer portal is not just a beautiful dashboard for a business's clients to perform account-related tasks. It constitutes the core of how an organization operates and defines the user experience they want to provide to its customers. It goes beyond allowing clients to update account information, track orders and deliveries, and upload documents without contacting support directly.
The biggest deciding factor for businesses to build a custom customer portal is that they do not want to outsource a vital part of the business, such as branding, workflow, systems integration, and data, to third parties. They want to own the experience, from customer onboarding to customer support.
This tutorial covers how to create a customer portal, or client portal, yourself. Its features will include authentication, a per-customer data view, and self-hosted deployment. This is a demo; however, production hardening steps will be mentioned in later sections.
Your business has customization and control over data residency when you are creating a customer portal. It also avoids per-seat pricing from SaaS products as your customer base grows.
When You Should Buy Instead
The build-versus-buy question for client portals usually comes down to engineering capacity, data control, and the level of customization you need. Neither option is universally better; it depends on what fits the organization now.
If you need a simple client portal maintained by non-developers, or the fastest possible time-to-live with no engineering capacity, buying is often the better fit. Retool and similar internal tool builders can quickly produce a portal, but the app stays within their platform.
If you cannot build a client portal due to the engineering costs involved, a customer portal builder is a better fit. If you care less about customizations and branding, and your portal needs are pretty basic, it's okay to buy.
Building makes sense when data control, customization, per-seat cost at scale, or self-hosting are the priorities. It also makes sense to build if you have technical teams capable of implementing third-party integrations and specific design requirements.
Prerequisites
To successfully create a client portal like this one, you'll need:
Python 3.10or newer is required; runpython --versionto confirm your versionuv: the package manager recommended by Reflex;pip/venv,conda, andpoetryare acceptable alternatives- Basic knowledge of Python programming: classes and type annotations
This tutorial will guide you through a series of steps on how to create a client portal in Python using Reflex. We'll use seeded customer data so you can complete it without a database. However, a real database will replace the seeded customer data in production.
Step 1: Set Up the Project
At the end of this section, you should have a blank Reflex app running in your browser at http://localhost:3000.
How to create a client portal in Python
Before we build a client portal, let's install some project dependencies uv and the Reflex framework. We'll confirm that the default app is running and create the additional folders and files needed for the project.
Install uv
Run the following command in your terminal to install uv on Linux/macOS:
Restart your terminal, or run source ~/.bashrc for Bash or source ~/.zshrc for Zsh, to make uv available in new sessions after installation.
Windows:
After installation, restart your terminal (PowerShell or Command Prompt).
If you use Apple Silicon, install Rosetta only if you hit an architecture error from a specific dependency.
Scaffold the app with Reflex
Create a new project folder and add Reflex:
uv init creates the pyproject.toml file and rflx_customer_portal subfolder required by the project. The uv add reflex command installs Reflex in your project through a .venv virtual environment.
uv run reflex init prompts you to select a template for scaffolding the app like this:
Type 0 and press Enter to select the blank Reflex app template.
A blank Reflex app is scaffolded with all the required files and subfolders. Your project structure should look like this:
The structure above shows the basic setup needed to launch a default blank Reflex app.
Other files and subfolders such as models.py, components , pages , states , needed for this project are created within the rflx_customer_portal subdirectory. The src subfolder and its content are deleted, as we will not be needing it.
Your project structure should look like this after new files and subfolders are created:
ExpandCollapse
Ensure you create the subfolders and files shown above as part of the project's final structure.
Confirm app runs
Run the app in development mode:
The command starts the dev server. The frontend runs at http://localhost:3000, while the backend runs on port 8000. Open http://localhost:3000 on your browser to see the default app to confirm it runs.
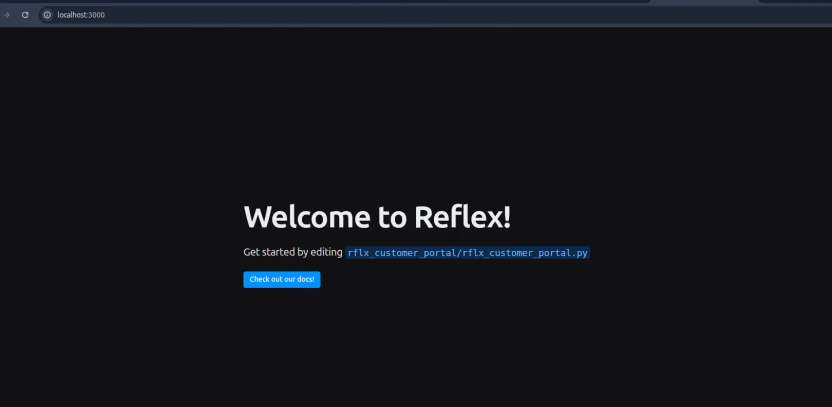
Reflex supports hot reloads, so changes you make to your code show up automatically in real time.
To fix the Radix theme warning, declare the required plugins in your project's rxconfig.py file.
Step 2: Model the Portal Data
The customer portal consists of Python data models Customer, Order, and Ticket. Since the real database is not yet connected, seeded data will power the portal. The portal state stores the logged-in customer ID and uses it to load that customer's data.
App entry point
Here is the customer portal's app entry point before we define the data models. The rflx_customer_portal.py file is found in the rflx_customer_portal folder of the project.
Importing pages account, dashboard and login registers their @rx.page() routes. An app instance is created with rx.App which handles both frontend and backend.
The app.add_page() method adds the default index() on route / and on_load redirects the user to /dashboard.
This app entry point renders without errors when other pages shown in the tutorial are created.
Portal data models
For the PortalState class, define Python data models for objects Customer, Order, and Ticket with proper annotations.
Create a file models.py in the rflx_customer_portal/rflx_customer_portal folder. The data models will be defined in that file.
ExpandCollapse
Each data model created includes fields indicating their data types, as required by the client portal.
Before connecting to a real database, we'll create some example data to simulate real customer data. In the same models.py file, add the seeded data below.
ExpandCollapse
The example data consists of three Python dictionaries: SEEDED_CUSTOMERS, SEEDED_ORDERS, and SEEDED_TICKETS.
SEEDED_CUSTOMERS maps customer IDs to Customer objects. SEEDED_ORDERS and SEEDED_TICKETS map customer IDs to lists of Order and Ticket objects, respectively.
Seeded plaintext passwords are for this local demo only. Never store or compare plaintext passwords in production, use a password-hashing library and verify the hash.
Always use a standard library (bcrypt, scrypt, or Passlib) to hash passwords and compare hashes.
Define the portal state class
The state class in Reflex stores the customer data your portal shows and updates it when users interact with the app.
The PortalState class inherits from AuthState which we define in the authentication section. That keeps the portal data and auth-related state in one place.
Create a portal_state.py file in your rflx_customer_portal/rflx_customer_portal/states folder.
ExpandCollapse
The PortalState class contains Reflex computed vars, marked with @rx.var and event handlers marked with @rx.event. Computed vars are functions that are decorated with @rx.var, and their values are recomputed whenever the state changes. Event handlers are functions that update the state of the app in response to events such as on_click or on_blur.
my_orders returns a list of orders for the currently logged-in customer. my_tickets returns the list of tickets created by the same logged-in customer. These are some of the computed vars in PortalState.
We're editing the seeded data in memory to keep the demo database-free. In production, each customer's data should be read from and written to a real database keyed to the logged-in user.
open_edit_ticket() method allows the logged-in user to edit the selected ticket details. The ticket fields become editable, allowing new information to be entered. The save_ticket() and save_profile() methods save edited tickets and the user profile information.
self.ticket_dialog_mode = "create": Create mode clears the form and opens an empty dialog.
self.ticket_dialog_mode = "edit": Edit mode loads the existing ticket into the same form, allowing the user to update it.
set_ticket_form_status sets the customer's ticket status to "pending," "resolved," "open," or "closed." set_edit_full_name updates the logged-in customer's full name to the new one entered. These are some of the event handlers found in PortalState.
Profile editing uses the same state pattern: load the current customer values, allow the user to edit them, and save the updates to the customer record.
Step 3: Add Authentication
This section will show how you can secure your client portal software by adding user-logged-in protected pages. The client authentication process begins with login forms that require a username and password. After the client's credentials are submitted, if they are valid, the client is granted access to the app. Authentication prevents users who are not logged in from accessing protected pages, as expected of a secure customer portal.
User authentication begins by creating the AuthState class, which inherits from rx.State. The AuthState class is defined in the rflx_customer_portal/rflx_customer_portal/states/auth_state.py file. Base vars such as login_username, login_password, is_authenticated are declared in AuthState class.
There are event handlers such as set_login_username for setting a customer's username to a given value. The login method begins a user session and redirects to the dashboard via the /dashboard route. logout clears the current user's session and redirects to the login page via /login.
ExpandCollapse
require_login runs on protected pages to verify the user is authenticated before the page loads. Event handlers update the app state when the user clicks a button or when a protected page loads.
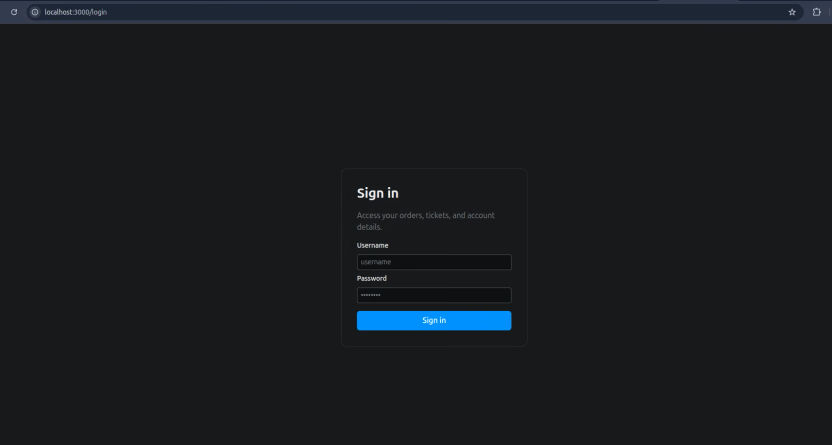
The login page serves as a protected entry point to the app, where a customer can see only their own data. The login.py file lives in rflx_customer_portal/rflx_customer_portal/pages. The code snippet below shows the page implementation.
ExpandCollapse
The @rx.page decorator adds the login form page to the login() method with the route defined as /login. rx.cond component conditionally renders a login error message.
rx.input component collects username and password and on_change updates AuthState.login_username and AuthState.login_password as the user types. AuthState.login event handler handles the rx.button component on_click event triggered after a user clicks the sign-in button.
Your login page should look like this:
The production authentication workflow is much cleaner and more secure on the Reflex Enterprise tier without manually added guardrails. By default, an authenticated user is required to access every page, event handler, base field, and computed var. The authentication plugin in enterprise adds OpenID Connect (OIDC) to Reflex apps.
The auth plugin runs the OIDC Authorization Code and Proof Key for Code Exchange (PKCE) flow against your identity provider (IdP) and registers /login, /logout, /callback, and /forbidden routes.
Step 4: Build the Customer-Facing Views
In this step, you'll build the customer dashboard, the account view, and the navigation that connects them.
Navigation bar component
The app's navigation system provides a reliable way for users to navigate between pages. The navigation bar is an important component of the customer portal; it typically displays the currently logged-in user and useful menu links.
Create a navbar.py file in the rflx_customer_portal/rflx_customer_portal/components folder.
The nav_link() function returns the rx.link component. It takes two parameters, text, which describes the link, and href, which is the route or HTTP link.
ExpandCollapse
The navbar() function returns the app's navigation bar. It includes links to the dashboard and account pages, plus the portal icon and heading. There is also a button component nested within which handles a logout when clicked.
The navigation bar is displayed across all pages of the portal app.
The dashboard page
Add a dashboard.py file to the rflx_customer_portal/rflx_customer_portal/pages folder. It defines helper functions for the orders and tickets table and the dialog used to edit tickets.
The rx.badge component, which indicates the status for either customer orders or tickets, is returned from the _status_badge function. An appropriate color is shown to match the current status of an order or ticket.
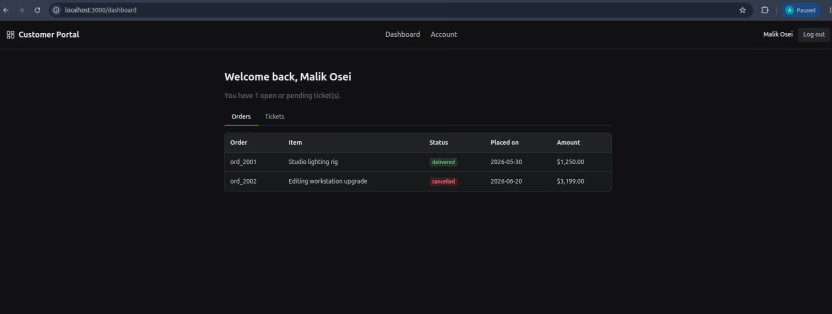
_orders_table function returns the order table as a component of the customer's dashboard. The helper function uses components such as rx.table.header(), rx.table.row(), and rx.table.body() to build the table. rx.foreach() is used to populate the table with a logged-in customer's data.
The _orders_table() and _tickets_table() functions use Reflex components to compose a table each for displaying the customer's orders and tickets.
ExpandCollapse
This section wires up the dashboard page itself. The dashboard page uses the @rx.page decorator with the route /dashboard. To access the dashboard page, a customer is required to be logged in; the AuthState.require_login event handler responds to the on_load trigger.
The dashboard() function renders components for the customer's dashboard page such as navbar(), _orders_table(), and _tickets_table(). Reflex layout components rx.box, rx.container, and rx.vstack give the dashboard a responsive and interactive user interface.
A look at the dashboard:
Account profile page
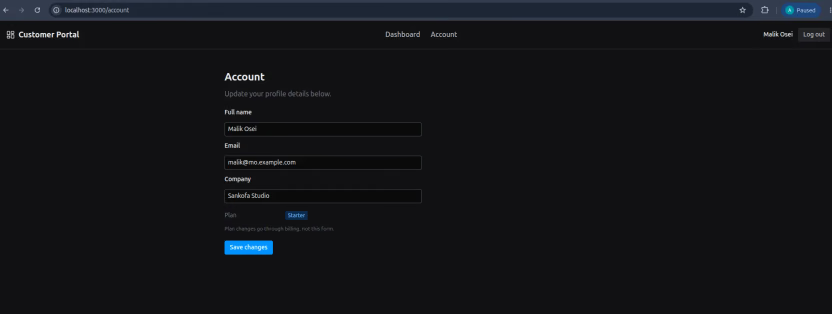
The user account/profile page provides an interface where a logged-in user can view and update their information. Create an account.py file in rflx_customer_portal/rflx_customer_portal/pages for code related to the user account page.
The account() function is decorated with rx.page and the route is defined as /account .
ExpandCollapse
Reflex styling and layout components are used to organize and structure the account/profile page. The account() function returns the Reflex rx.box component, which is the parent component for this page. All other components are safely nested within it.
The rx.cond components conditionally render the profile form error message and save message. The rx.input components are the editable fields for user data, such as full name, email, and company.
Account page:
Step 5: Deploy and Host It Yourself
You have a working custom customer portal running on http://localhost:3000 in your browser. Next, deploy it online. You can use Reflex Cloud or self-host it.
How to deploy to Reflex Cloud
Reflex Cloud lets you or your team deploy your apps online without managing the underlying infrastructure. Before you use this option, ensure you have a Reflex Cloud account.
Run the command below in your terminal. This signs you in so Reflex can associate the deployment with your account:
The above command will prompt you to log in to your Reflex Cloud account. You can also copy the URL in your terminal, paste it into your browser, and complete your login.
Run the command below to deploy:
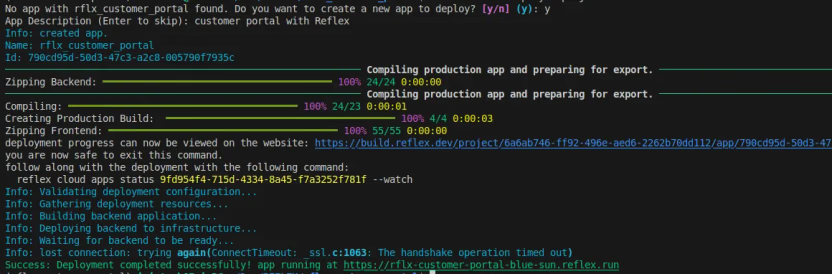
A few questions will pop up in your terminal; answer as appropriate to continue deployment. After a successful deployment, you should see a similar message in your terminal:
Success: Deployment completed successfully! app running at <some_url>.reflex.run
See example console output:
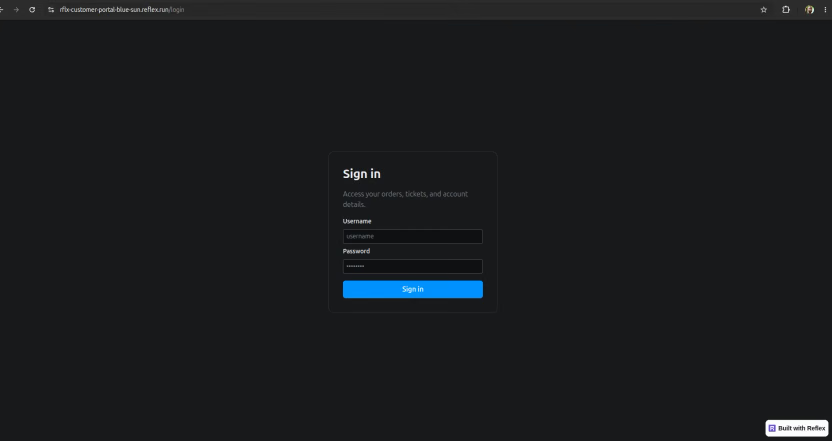
After deployment, open the live app URL shown in your terminal and confirm the portal loads in the browser.
How to self-host your portal
To self-host your customer portal with Reflex, point the app at your own backend. Then run it on your server.
To begin self-hosting your customer portal, clone your codebase to your server and install the required dependencies.
In your project's rxconfig.py file, make an edit and point the api_url to the server's hostname or publicly accessible IP address with port :8000. This will enable your application's frontend to interact with the backend state.
The edit should look like this:
Run your app in production mode:
Production mode uses the deployment settings you would use in a live server.
There is another option if you want to deploy a containerized application. Create a Dockerfile in the root of your project and make sure that your project's requirements.txt file is up to date and reflex is listed among the packages.
Edit the rxconfig.py file and set the api_url to a public IP address as seen in the previous code snippet.
Build your container image via the command:
Start your customer portal service as follows:
With Reflex, you can host a customer portal on your own infrastructure and control where the data lives. On-prem, in a VPC, or in an air-gapped environment is just a matter of where you point the app.
Next Steps: The Future of Customer Portals
Now that the portal works with seeded customer, order, and ticket data, the next step is to replace the demo data and add production authentication.
If you want to move beyond seeded data, swap in real database integrations (for example, PostgreSQL) so customer records persist as your client base grows. For production auth, consider integrations with an external provider such as Google, Okta, or Clerk.
You can improve the app by adding a custom domain. You can also expand the portal to include more customer self-service actions, such as document uploads, payment receipt downloads, and service agreement signing.
Customer portals are also moving towards AI integration for a better user experience. There can be more conversational interfaces in which AI agents can act on behalf of customers. Client portals can be more composable and customizable for customers, so each user has a personalized experience.
Written by

FAQs
Should you build or buy a customer portal?
Buy if you are okay with paying recurring fees and pricing for a customer portal builder and only require basic portal functionality with no branding and customization. If your team wants more control, build to meet your requirements.
How do you create your own client portal?
There are two ways to create your own client portal: use a client portal builder such as Retool or Softr, or build it yourself.
Can you self-host a customer portal?
Yes. Self-hosting means you can run your app on your own server, in your own VPC, or in an air-gapped environment. It gives you control over data residency, security requirements, and deployment overhead.
What features does a customer portal need?
Customer portals should typically support features such as authentication, per-customer data views, account/profile management, and a dashboard for common self-service tasks, including orders, tickets, and documents.
How much does it cost to build a customer portal?
It could cost a few hundred to thousands of dollars to build a customer portal. The cost varies from small and medium-sized businesses to enterprise organizations because of their needs.
What is the best customer portal software?
There is really no "best" customer portal out there; however, you can always find one that fits your budget, use case, and your customers' needs. A good mention includes Salesforce with its portal features, Softr, Retool, etc.
How long does it take to build a client portal?
Variables such as scope, software requirements, and engineering team capacity determine how long it takes to build a client portal. A minimalist client portal with basic features could take a couple of days to a few weeks to ship. Meanwhile, an enterprise-grade, production-ready client portal with extensive integrations could take 2 months or more to build and ship.
How do you make sure each customer only sees their own data?
Create customer portals that implement per-customer data scoping on the server side and enforce it by using the authenticated user's identity or session.
Can a customer portal integrate with my CRM?
Client portal integrations with CRMs can be done. CRMs can be integrated into customer portals via webhooks, APIs, and embedded widgets for the management and synchronization of customer data.